
If your siding looks warped, rippled, or bubbled like it started to melt, it almost certainly reached temperatures above vinyl's distortion threshold, typically around 160°F to 165°F, from concentrated heat. Stop the heat source first, document everything with photos, and only then start planning repairs.
TL;DR:
- Melting or warping of vinyl siding occurs when surface temperatures reach around 160°F to 165°F, often caused by focused heat sources like reflective windows or nearby fires.
- Diagnosing the exact cause requires observing damage patterns, using infrared thermometers, and testing with shading to confirm the heat source before attempting repairs.
- Replacing damaged panels involves careful removal, measurement, and leaving room for thermal expansion; professional help is recommended if multiple courses or sheathing damage are involved.
- Insurance and manufacturer warranties rarely cover heat-reflection damage unless solid documentation shows the progression over time and the specific hot spots involved.
- Preventative measures include relocating heat sources, shading reflective surfaces, planting trees, or installing heat-tolerant siding, to avoid repeating damage in future warm seasons.
Table of Contents
- What Causes Melted Vinyl Siding in the First Place
- How to Confirm What's Actually Melting Your Siding
- Fixing Melted Siding: DIY Repair Steps and When to Call a Pro
- Will Insurance or the Manufacturer Cover the Damage?
- Preventing Melted Siding Before It Happens Again
- When to Call a Contractor for a Melted Siding Assessment
- What Happens to Siding and Insulation if Melted Panels Are Ignored
- Cleaning and Maintaining Siding After Heat Damage
- Common Mistakes Homeowners Make Fixing Melted Siding
- The Real Priority Isn't the Panel, It's the Pattern
- Get a Professional Siding Assessment From Exteriorgenie
- Sources
- FAQ
What Causes Melted Vinyl Siding in the First Place
Vinyl siding isn't built to handle direct, sustained heat the way brick or fiber cement is. Standard vinyl formulations start to soften and warp once surface temperatures climb into a fairly narrow window, and once you understand that threshold, most "mystery" melting cases stop being mysterious.
Lab testing and technical bulletins put the distortion range between about 142°F and 192°F, with 166°F commonly cited as the average point where visible deformation begins. One test found that a full hour of exposure at 165°F produced measurable distortion, and that time factor matters more than most homeowners realize. Vinyl doesn't need a single blast of extreme heat. Repeated moderate exposure across several afternoons can add up to the same surface temperature distortion as one longer session, because the material's stiffness drops predictably as both heat and time increase.
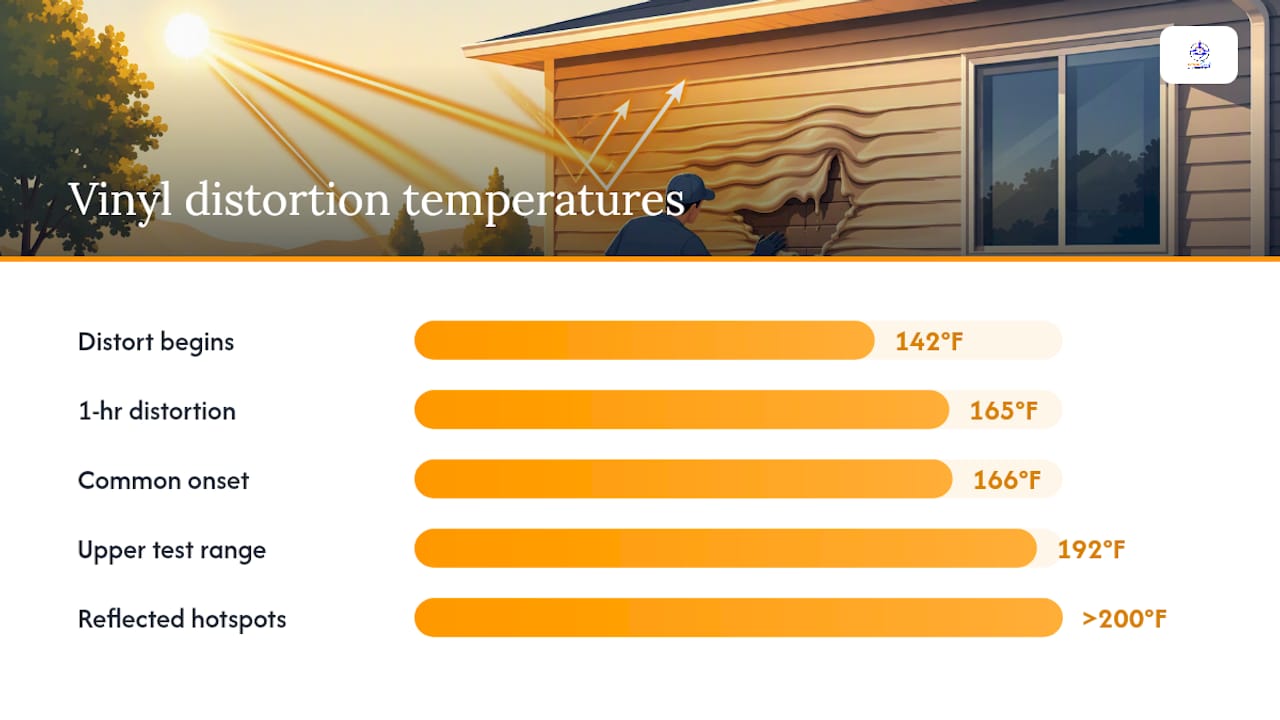
Statistic to know: reflected hotspots off glass have been measured above 200°F in documented cases, well past the point where vinyl starts to sag and buckle.
The most common culprits behind that kind of heat include:
- Low-E or insulated windows that reflect concentrated sunlight onto neighboring siding
- Grills, fire pits, or chimineas placed too close to exterior walls can cause heat damage to vinyl siding.
- Reflective metal roofing, mirrors, or glass patio tables angled toward the house
- Dark-colored siding, which absorbs more heat than lighter shades
- Inside corners and alcoves where reflected or radiant heat gets trapped with nowhere to dissipate
Color matters more than people expect. Dark vinyl absorbs significantly more solar energy than white or light gray panels, which is why darker siding on the same wall as a reflective window often shows damage first.
How to Confirm What's Actually Melting Your Siding
Before you touch a single panel, figure out exactly what's cooking your siding. Guessing wrong means you might replace panels only to watch them warp again within a season.
- Look at the damage pattern. A diagonal or fan-shaped warp pointing toward a window usually means reflected sunlight. Random, blotchy damage with no clear direction points more toward a manufacturing or installation defect.
- Check at different times of day. Reflected heat from windows tends to hit at specific hours, often midmorning or late afternoon, depending on orientation. Watch the wall for a few days and note when the hot spot appears.
- Use an infrared thermometer. These run cheap at any hardware store. Aim it at the suspect area during peak sun hours and log the readings.
- Photograph everything with timestamps. This becomes your evidence file if you end up filing an insurance claim or a warranty dispute.
- Check what's aligned with the damage. Walk outside and look for a neighbor's Low-E window, your own grill, a reflective roof, or a glass table sitting in the sightline of the melted section.
- Test with temporary shade. Hang a towel or tarp over the suspect window or reflective surface for a few days. If the hot spot stops growing, you've found your source.
Pro Tip: Keep a simple log with the date, time, outdoor temperature, and your thermometer reading for at least a week. Insurance adjusters and contractors both respond better to a data trail than to "it just started melting one day."
Fixing Melted Siding: DIY Repair Steps and When to Call a Pro
Once you've identified and blocked the heat source, repair becomes straightforward for a single damaged panel, and considerably less straightforward if the damage spans multiple courses or you suspect sheathing damage underneath.
DIY panel replacement, step by step:
- Gather a zip tool (also called a siding removal tool), a utility knife, tin snips or a siding cutter, a tape measure, and galvanized nails.
- Use the zip tool to unlock the panel above the damaged one, then unhook the damaged panel from the course below it.
- Remove the old nails and pull the panel free.
- Measure and cut the replacement panel to match, leaving a small gap at each end for thermal movement.
- Nail the new panel in place, but don't drive nails tight. Leave roughly a 1/16 inch of play at each nail head so the panel can expand and contract with temperature swings without buckling.
- Reseat the top course with the zip tool so the panels lock back together properly.
Color mismatch is the part that trips people up. New vinyl fades differently than weathered panels, so a fresh replacement piece often stands out like a patch. Your options here:
- Source a salvaged or weathered panel from a siding supplier that stocks discontinued colors
- Paint the new panel with a vinyl-safe exterior paint, though this can affect the warranty on some products
- Replace the entire wall section for a uniform look, which costs more but avoids a visible seam
Call a professional if you spot signs of sheathing or housewrap damage behind the panel, if more than one or two courses are affected, or if the distortion keeps coming back after repair. That last one almost always means the heat source is still active. DIY panel swaps typically run a homeowner a modest materials cost for a weekend project, while professional repairs involving multiple courses or underlying sheathing repair run higher. Get a local quote before assuming either direction.
Will Insurance or the Manufacturer Cover the Damage?
Don't assume this is an automatic payout. Homeowners insurance coverage for heat-reflection siding damage varies widely by policy, and many insurers treat it as an avoidable, gradual issue rather than a sudden covered peril, especially when a neighbor's window is the source. Some claims get denied outright. Others get reconsidered once solid documentation lands on the adjuster's desk.
Manufacturer warranties tend to be even less forgiving here. Most vinyl siding warranties explicitly exclude damage caused by external heat sources like reflected sunlight, grills, or fire pits, since that falls outside normal product defects.
What actually moves the needle on a claim or appeal:
- Timestamped photos showing the progression of damage
- Infrared or thermometer readings from the hot spot
- An independent inspection report from a licensed contractor
- Written repair estimates itemizing the scope of work
If your claim gets denied, request the denial in writing and ask exactly which policy clause it cites. That document is what a public adjuster or independent inspector will need if you decide to push back.
Preventing Melted Siding Before It Happens Again
Stopping the heat is always cheaper than replacing panels twice. Start with the fastest, lowest-cost fixes and work up from there.
Short-term moves you can make this week:
- Relocate grills and fire pits at least 10 to 15 feet from any exterior wall
- Install exterior solar screens on the window causing the reflection
- Hang a temporary awning or fabric shade over the problem area during peak sun hours
Medium-term options:
- Apply window film or an anti-reflective coating to the offending glass; these reduce reflected energy, though effectiveness depends on the film spec and the window's exact geometry
- Coordinate with a neighbor if their window is the source. This isn't always a comfortable conversation, but it's often the only real fix
Long-term fixes:
- Plant fast-growing shrubs or trees to intercept the reflected beam
- Consider fiber cement or other heat-tolerant cladding for the specific wall section that keeps getting hit
- Install permanent shutters, which double as added sun protection for the whole facade, not just the damaged section
Pro Tip: Don't just replace the melted siding and call it done. If the reflective source is still aimed at that wall, you're likely to be back here again next summer. Fix the heat, then fix the panels, in that order.
One warning worth repeating: replacing only the siding or only tinting the window rarely solves this on its own. Orientation, glass shape, and siding color all interact, so the fix usually needs to hit more than one factor at once.
When to Call a Contractor for a Melted Siding Assessment
A qualified contractor doesn't just swap panels. A proper inspection documents the hot spot pattern, checks the sheathing and housewrap for hidden moisture or heat damage behind the vinyl, takes temperature readings at different times of day, and recommends a repair scope based on actual findings rather than guesswork.
Exteriorgenie approaches these calls the way we approach every exterior claim: methodically, with documentation that holds up if insurance gets involved. As a veteran-owned contractor and an Owens Corning Platinum Preferred Contractor, our crews are used to working both the repair and the paperwork side of storm and heat damage.
Before a visit, have your photos, thermometer readings, and a rough timeline of when the damage started ready to go. It saves everyone time and gives the inspection something concrete to work from.
What Happens to Siding and Insulation if Melted Panels Are Ignored
Melted vinyl isn't just a cosmetic problem, though it often starts looking like one. Left alone, warped panels stop shedding water the way they're designed to. Gaps and buckled seams let moisture behind the siding, and that's where the real damage begins.
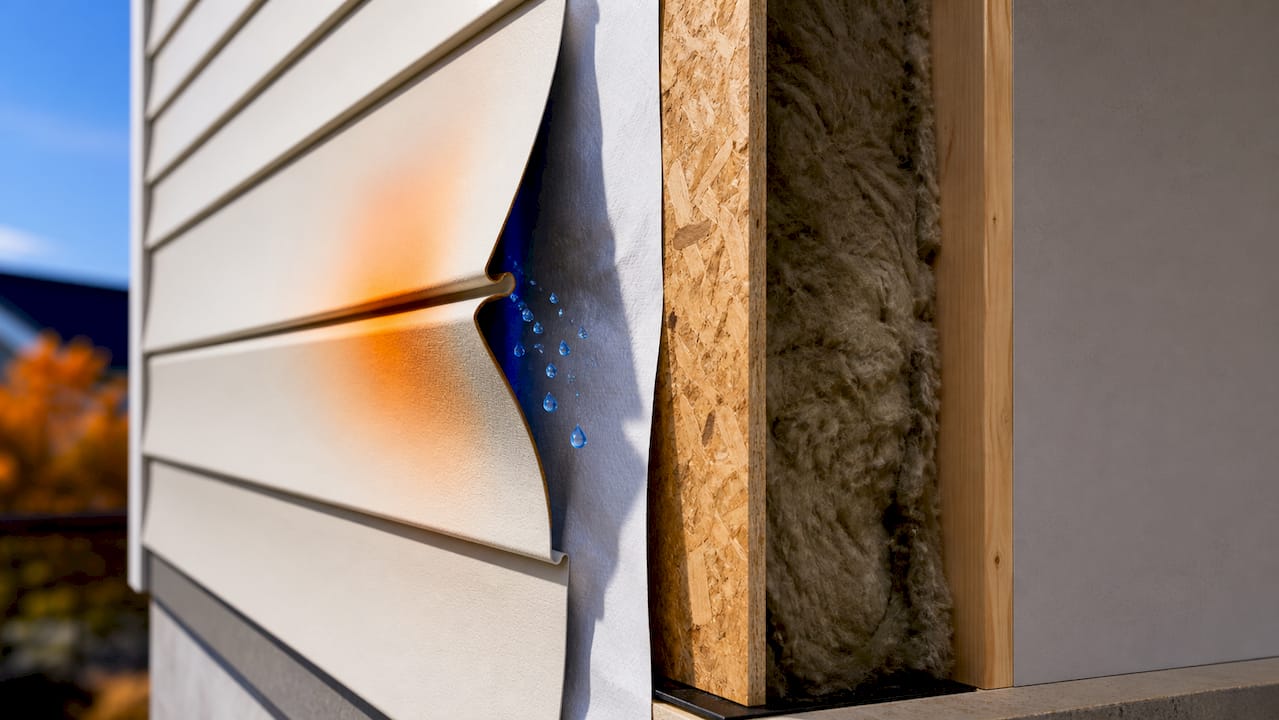
Trapped moisture behind distorted panels can soak into the housewrap and sheathing over time, creating conditions for rot, mold, and eventually structural softening of the wall assembly underneath. Vinyl siding isn't load-bearing, but the sheathing behind it often is part of the wall's structural skin, and repeated water intrusion weakens it gradually rather than all at once, which is exactly why it tends to go unnoticed for a season or two.
Insulation performance takes a hit too. Warped panels create gaps that let air infiltrate around the wall assembly, undercutting whatever insulation is doing behind the siding. That shows up as higher heating and cooling bills long before it shows up as a visible problem, which is part of why catching melted siding early matters more than it looks like it should.
The panels themselves also lose structural rigidity once they've been heat-distorted. Vinyl that's been softened and reshaped doesn't fully return to its original tensile strength even after it cools, making it more brittle and prone to cracking in cold weather or under wind load. That's one more reason a "just leave it, it's only cosmetic" approach tends to cost more down the road than a prompt panel swap.
Cleaning and Maintaining Siding After Heat Damage
Once repairs are done, a little maintenance keeps the problem from creeping back or getting worse in a different spot.
Start with a simple wash. Use a soft brush or a garden hose with a low-pressure nozzle and a mix of mild dish soap and water on the repaired section and the surrounding panels. Avoid pressure washers set above a gentle setting, since high pressure can force water behind seams that may already be compromised from heat exposure.
Inspect the repaired area every few months, especially after the first hot season following a repair. Look for any new softening, discoloration, or slight warping near the same spot, which would mean the heat source wasn't fully addressed.
Check the caulking and trim around the repaired panels annually. Heat exposure can dry out sealant faster than normal weathering does, and a cracked seal is an easy entry point for water.
A few practical habits worth adding to your routine:
- Rinse pollen, dust, and grime off the siding twice a year to prevent buildup that traps heat
- Trim back any new plant growth that could shade beneficial airflow or, worse, create its own reflective surface (glass ornaments, mirrors, reflective mulch)
- Reapply or check window film every few years, since UV exposure degrades most films over time
- Keep an eye on the grill or fire pit relocation you made. It's easy to slide it back toward the house without thinking about it
Common Mistakes Homeowners Make Fixing Melted Siding
The single biggest mistake is repairing the panel before fixing the heat source. Swap the vinyl, skip the diagnosis, and you're often looking at the same warped panel by next August.
Other mistakes that show up constantly:
- Nailing too tight. Driving nails flush against the panel instead of leaving room for expansion causes buckling and waviness that has nothing to do with heat at all.
- Mismatched replacement panels. Grabbing whatever vinyl is available at the hardware store instead of matching the exact profile and color creates an obvious patch that ages differently than the rest of the wall.
- Skipping the sheathing check. Replacing the visible panel without checking what's behind it means moisture damage can sit hidden for months.
- Assuming one fix solves it. Blocking the window reflection but ignoring the grill six feet away (or vice versa) leaves half the problem in place.
- Waiting too long to document. Damage that's already progressed by the time you start taking photos gives you a weaker case for insurance or warranty claims.
- DIY repairs on multiple courses. A single panel swap is manageable for most homeowners. Multiple affected courses, or any hint of structural involvement, is a job for a licensed contractor.
Avoiding these mistakes isn't complicated, but it does require doing things in the right order: diagnose, document, stop the heat, then repair.
The Real Priority Isn't the Panel, It's the Pattern
Most advice on melted siding jumps straight to repair instructions, and that's backward. The panel swap is the easy part. The part homeowners consistently skip is spending three or four days actually watching where and when the heat shows up, and that single step is what separates a repair that lasts from one that doesn't.
Conventional wisdom treats this like a simple maintenance issue: something broke, replace it. But heat-reflection damage is closer to a design problem between two properties, your siding and someone's window geometry, and that's a harder conversation than buying vinyl at the hardware store. Homeowners who skip the diagnosis step almost always end up doing the repair twice.
If there's one thing worth prioritizing above all else, it's the timestamped log. Insurance adjusters, contractors, and warranty reps all respond to data, not descriptions. A week of thermometer readings and dated photos does more for your case than any amount of explaining the situation over the phone.
— Ebben
Get a Professional Siding Assessment From Exteriorgenie
If you've already tried moving the grill or shading the window and the damage keeps coming back, or if you're not sure whether you're looking at a single panel fix or something deeper behind the wall, that's exactly the point where a professional inspection pays for itself. Exteriorgenie is a veteran-owned contractor serving Lexington and the Midlands, and our HAAG-certified team handles both the repair and the insurance side of exterior damage, so you're not managing two separate headaches at once.

Our crews document hot spots, check the sheathing and housewrap behind the panels, and give you a repair scope based on what's actually happening on your wall, not a guess. If a claim gets denied or you're not sure whether your policy covers reflected heat damage, our insurance claims assistance team can help you push back with the right documentation. Ready to get eyes on the damage? Start with our vinyl siding repair and installation page to see what a proper assessment looks like and request a quote.
Sources
- Vinyl Siding Distortion Technical Service Bulleting # IG14-1/16
- This Old House — How to repair melted vinyl siding
- Progressive — Does homeowners insurance cover siding?
FAQ
How Can I Fix Melted Vinyl Siding?
Identify and stop the heat source first, then replace the damaged panel using a zip tool to unlock and remove it, cutting a properly sized replacement, and nailing it with room for thermal expansion. Multiple affected courses or suspected sheathing damage call for a professional repair.
At What Temperature Does Vinyl Siding Melt or Warp?
Most vinyl siding starts to soften and visibly distort at surface temperatures between roughly 160°F and 165°F, with some documented reflected hotspots measuring above 200°F.
What Should I Do if My Grill Melted My Vinyl Siding?
Move the grill at least 10 to 15 feet from the wall immediately, photograph the damage with a timestamp, and then replace the affected panel; check whether your homeowners policy or the siding manufacturer's warranty covers heat damage from grills, since many exclude it.
Is Melted Siding Damage Covered by Homeowners Insurance?
Coverage varies significantly by policy, and many insurers deny claims for reflected-heat damage they consider avoidable or gradual. Thorough documentation, including photos, temperature readings, and an independent inspection report, improves your odds of a successful claim or appeal.